
Overview
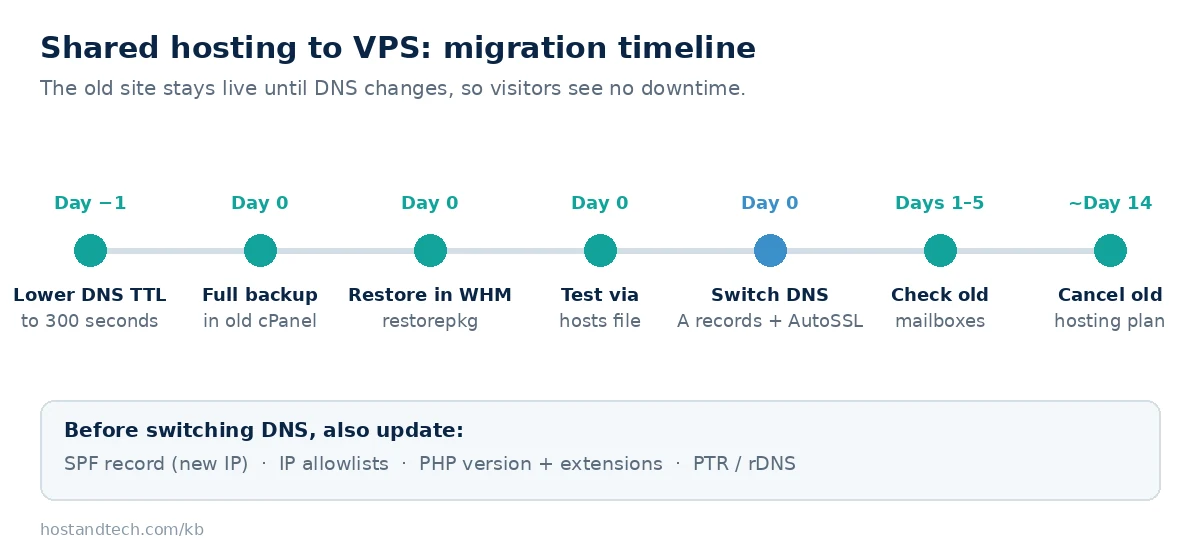
To migrate from shared hosting to a VPS, take a full account backup in cPanel, restore it on the VPS in WHM, test the site through your computer’s hosts file, and only then point DNS at the new server. Done in that order, visitors never see downtime, and email keeps flowing. Expect one to two hours of hands-on work for a typical site, plus a day of preparation for DNS.
This guide is for cPanel shared hosting customers moving to a VPS that runs cPanel & WHM. It assumes you’ve already decided a VPS is the right move; if you’re not sure yet, shared hosting benefits, limits and when to upgrade and VPS vs shared hosting will help you decide. It also covers the parts most migration guides leave out: the settings tied to your old IP address, and the email that arrives while DNS is changing.
Prerequisites
- A VPS with cPanel & WHM installed and licensed, and root or WHM login. cPanel’s own minimum is 1 GB of RAM and 20 GB of disk, but plan on at least 2 GB of RAM for a real site.
- Free disk space on the VPS of at least twice your account size: one copy for the backup file, one for the restored account.
- Login to wherever your DNS is managed: your registrar, your old host’s Zone Editor, or a service like Cloudflare.
- A list of anything that lives outside cPanel: external DNS, third-party email (Google Workspace, Microsoft 365), payment gateways or APIs that only accept requests from your server’s IP.
Step-by-Step: Migrate From Shared Hosting to a VPS
Step 1: Size the VPS from your real usage
In cPanel, open Resource Usage (on CloudLinux servers) and look at the last 30 days of CPU, memory and entry process peaks. Note the disk usage and inode count from the Statistics panel. If you’re moving because you kept hitting limits, the shared hosting resource limits guide explains what each graph means. Choose a VPS with headroom above those peaks, because cPanel, the mail server and MySQL now share the VPS’s memory with your site.
Step 2: Lower your DNS TTL a day ahead
TTL is how long other servers cache your DNS records. cPanel’s default is 14400 seconds (4 hours). At least one old TTL period before the move, and ideally 24 hours before, set the TTL on the A records for your domain, www and mail to 300 (5 minutes) in your DNS manager. When you switch later, the change reaches everyone within minutes instead of hours. The cPanel Zone Editor guide shows where to edit TTLs.
Step 3: Prepare the VPS
- In WHM, open MultiPHP Manager and make sure the PHP version your site uses on shared hosting is installed. Check the version in cPanel’s MultiPHP Manager or Select PHP Version on the old account first.
- Install the same PHP extensions (for example
imagick,intl,soap) with EasyApache 4; see configuring PHP in WHM with EasyApache 4. - Check the MySQL or MariaDB version is the same or newer than the old server’s, shown in cPanel’s General Information panel under Server Information.
- Set a proper hostname and reverse DNS (PTR) for the VPS IP, so mail sent from it isn’t rejected.
Step 4: Create a full account backup on the old host
- In the old cPanel, open Backup (Files section).
- Click Download a Full Account Backup.
- Set Backup Destination to Home Directory, enter your email for a notification, and click Generate Backup.
You’ll get an email when it’s done. The file appears in your home directory as backup-MM.DD.YYYY_HH-MM-SS_username.tar.gz and contains your files, databases, email accounts and mail, DNS zones, SSL certificates and cron jobs. On a big account this can take an hour; start it early.
Step 5: Copy the backup to the VPS
Pull the file straight from the old server to the VPS rather than downloading it to your own computer first. From the VPS as root, if your old host allows SSH:
cd /home
scp olduser@old-server.example.net:~/backup-*.tar.gz /home/
If the old host has no SSH, download the file from cPanel’s File Manager and upload it to /home on the VPS with SFTP. Transferring files with SCP covers both directions.
Step 6: Restore the account in WHM
In WHM, go to Transfers > Transfer or Restore a cPanel Account, choose to restore from a file in /home (or upload it there), and start the restore. From the command line it’s one line:
/scripts/restorepkg /home/backup-MM.DD.YYYY_HH-MM-SS_username.tar.gzKeep the same cPanel username. Database and database-user names carry the username as a prefix (username_wp), so a different username means editing every config file that connects to a database.
Step 7: Test the site before touching DNS
Point only your own computer at the VPS by adding a line to your hosts file, using the VPS IP:
203.0.113.25 example.com www.example.comOn macOS and Linux the file is /etc/hosts (edit with sudo nano /etc/hosts). On Windows it’s C:\Windows\System32\drivers\etc\hosts; open Notepad as administrator to edit it. Then check the home page, a few inner pages, contact forms, the admin login, a checkout if you have one, and sending a message from webmail. Expect a certificate warning at this stage: AutoSSL can only issue the new certificate once public DNS points at the VPS.
Step 8: Fix the things tied to the old server
- SPF record: if it lists the old server’s IP (
ip4:) or the old host’s include, update it to the VPS IP. See how to create an SPF record. - IP allowlists: payment gateways, APIs, remote database access and backup services that only accept your old IP.
- Hard-coded paths: scripts or cron jobs using the old server’s paths, if your home directory path changed.
- DKIM: the backup carries the DKIM key, but confirm in cPanel’s Email Deliverability that the DNS record matches.
Step 9: Switch DNS
The simplest switch is to keep DNS where it is and change the A records for the domain, www, mail and any other subdomains to the VPS IP. Moving nameservers to the VPS at the same time adds a second thing that can go wrong; do it later if you want it. Remove the hosts file line afterwards so you see what everyone else sees. DNS propagation time explains how to watch the change spread. Once DNS resolves to the VPS, run AutoSSL in SSL/TLS Status instead of waiting for the nightly run. Check the AAAA record as well: a leftover IPv6 record pointing at the old host is a common cause of ERR_SSL_PROTOCOL_ERROR after a move.
Step 10: Catch the last emails and close the old account
For a few hours some senders will still deliver to the old server. Log in to the old webmail daily for three to five days and move any stragglers, or sync them with imapsync if you have many mailboxes. Keep the old hosting account for one to two weeks as a fallback, then cancel it.
Common Issues & Troubleshooting
Error establishing a database connection
Cause: the account was restored under a different username, so database names and users changed prefix, or the database user lost its privileges during restore.
Fix: in cPanel’s MySQL Databases, check the real database and user names, add the user to the database with all privileges, and update the site’s config file (for WordPress, wp-config.php). The database connection error guide has the full checklist.
The site shows a default cPanel or “SORRY” page
Cause: the request reaches the VPS on an IP the account isn’t assigned to, or on a hostname the account doesn’t know about.
Fix: in WHM’s List Accounts, check the account’s IP and make sure your DNS or hosts file uses that exact IP. If you moved the domain to a different account, add it as an addon or parked domain there.
Emails still arrive at the old server
Cause: the mail A record or the MX record still points at the old host, or senders cached the old records.
Fix: check dig +short MX example.com and dig +short A mail.example.com. Point both at the VPS, and keep checking the old mailbox until the old TTL has long passed.
Restore fails with “account already exists” or a username conflict
Cause: a test account with the same username or domain was already created on the VPS.
Fix: remove the test account in WHM (Terminate Accounts) only if it holds nothing you need, then run the restore again.
Ready to move? Host & Tech SSD VPS plans are available in sizes that suit a first move off shared hosting. Open a ticket at our help centre before you start and we’ll tell you what help is available for your migration.
Frequently Asked Questions
How long does it take to migrate from shared hosting to a VPS?
For a typical site, the backup, transfer and restore take one to two hours of work. Add a day beforehand for lowering the DNS TTL, and three to five days afterwards of checking the old mailbox. Visitors see no downtime if you test with a hosts file before switching DNS.
Will my website go down during the migration?
No, if you follow the order in this guide. The old site keeps running until DNS changes, and with a 300-second TTL the switch reaches most visitors within minutes. The only visible change is a few minutes where some visitors reach the old server and some the new one.
Do I need to change nameservers when moving to a VPS?
No. Changing the A records for the domain, www and mail to the VPS IP is enough, and it’s the safer option. You can move nameservers to the VPS later if you want to manage DNS there.
Can I migrate to a VPS without cPanel?
Yes, but it’s manual: copy files with rsync or scp, export databases with mysqldump, recreate the web server virtual host, and set up email separately. It suits developers comfortable on the command line; everyone else saves time with cPanel and WHM on the VPS.
Does the cPanel full backup include my email?
Yes. A full account backup contains email accounts, forwarders, filters and the messages stored on the server, along with files, databases, DNS zones, SSL certificates and cron jobs. Mail that arrives on the old server after the backup is taken has to be moved separately.