In this article we will learn about Domain Alias, how to create and remove it in Plesk control panel.
Domain Aliases Definition and Features
Domain alias is an alternate name for any another domain. It allows you to assign more than one domain name to one hosting place or one web site. Unlimited number of domains pointing to a single web site is called the domain aliases of the main domain.
How To Create Domain Alias in Plesk
- At the first login to your Plesk control Panel.
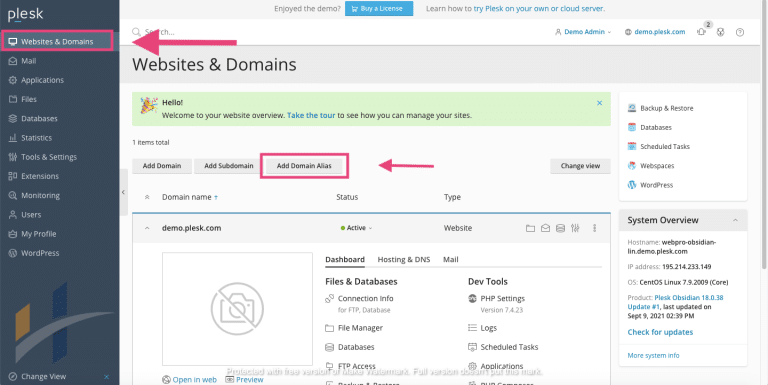
- Navigate to Websites & Domains Tab then click Add Domain Alias button.

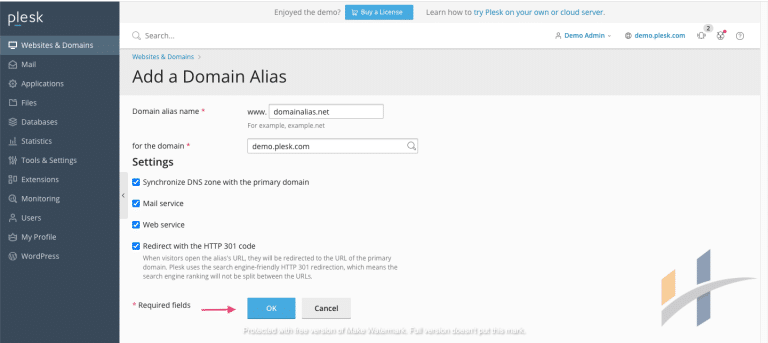
- Enter the following on the Add a Domain Alias Page:
- Domain alias name : Type the domain name you want to alias for your primary domain.
- For the domain: If you have more than one domain select the Primary one.
- Settings: include the following options: leave it as default if you are not sure about the right options .
- Synchronize DNS zone with the primary domain :when you enable this option, the DNS zone of the domain alias will be in sync with the zone of the primary domain. So if you make any to the DNS zone of the primary domain will be automatically applied to the DNS zone of the alias.
- Mail service : If you select this option, mailboxes created under the primary domain will also be available under the alias. To enable users to read mail sent to mailboxes under the alias, Plesk forwards it to the corresponding mailboxes within the primary domain.
- Web service :When you enable this option, the website will be opened in the browser at the alias’s URL.
- Redirect with the HTTP 301 code: if you tick redirect 301 ,the alias appears to be a separate website for visitors and for web search engines.
- Now click Ok button.

How To Remove Domain Alias in Plesk?
- Login to your Plesk control Panel.
- Navigate to Websites & Domains, locate the alias domain name block box and click Remove Domain Alias.
- Finally confirm the delete operation.

