
In this article we will show you how to use the Zone Editor in cPanel, to manage custom DNS records.
What Is DNS Records?
The abbreviation DNS stands for Domain Name System record. And it is a database record that is used to map a URL to an IP address. These DNS records are stored in DNS servers and work to help connect their websites to the outside world.
There are many types of DNS records, and some of them are:
- Name Server (NS) Record: It describes a name server for the domain that allows DNS lookups within several zones. Every primary and secondary name server must be reported via NS record.
- Address (A) Record: It is used to map a hostname to an IP address. Mostly, records are IP addresses. Suppose, if a computer has multiple IP addresses, adapter cards, or both then it must possess multiple address records also.
- CNAME Canonical Name Record: It is used to set an alias for the host name. For example, you could create a CNAME record for test.demo.com associated with demo.com. To clarify, when a DNS lookup for test.demo.com occurs, it receives in response the associated demo.com domain, and subsequently performs a lookup on its A record. Also, CNAME records enable you to define multiple domains without having to specify an IP address for each one.
- TXT Text Record: It permits the insertion of arbitrary text into DNS record. Also, these records add SPF records into a domain.
Adding DNS Records In cPanel
To add a record, follow these steps:
- Firstly, login to cPanel.
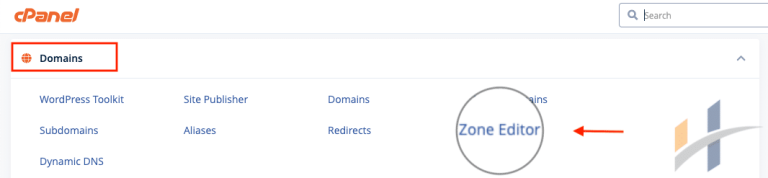
- Locate Domains section, and click Zone Editor.
- Under Domains, locate the domain for which you want to add a record, and then click Manage.

- Click the down arrow, next to Add Record, after that, click the type of record you want to add.

- Type the fully-qualified domain name FQDN for the record, in the Name text box.
- Type the time-to-live value in seconds, in the TTL text box.
- Confirm that the Type list box contains the type of record that you want to add.
- In the Record text box, type the value for the record.
Note
If you are adding an A record, type the IP address to associate with the domain name that you selected. Or if you are adding a CNAME record, type the associated canonical name for the domain name that you selected. Or type the data for the TXT record, If you are adding a TXT record.
- After that, click Add Record.
Editing a DNS Record In cPanel
To edit a record, follow these steps:
- Firstly, login to cPanel.
- Locate Domains section, and click Zone Editor.
- Under Domains, locate the domain for which you want to edit a record, and then click Manage.
- Locate the record you want to edit, and then under Actions, click Edit
- Modify the value or values you want to change, and after that, click Save Record.
Important
Modifying some types of records can make your web site inaccessible, prevent e-mail from working correctly, or cause other unintended side effects.
Deleting a DNS Record In cPanel
To delete a record, follow these steps:
- Firstly, login to cPanel.
- Locate Domains section, and click Zone Editor.
- Under Domains, locate the domain for which you want to delete a record, and then click Manage.
- Locate the record you want to delete, and then under Actions, click Delete
- After that, in the Confirm Deletion prompt, click Continue.
Important
Deleting some types of records can make your web site inaccessible, prevent e-mail from working correctly, or cause other unintended side effects.
For more information, visit Our Domains section.